Repair Your BCD Boot Blue Screen of Death

Windows 10 Blue Screen of Death

Failure to Boot After The Dreaded Blue Screen of Death

Occasionally in Windows 10 when a Blue Screen of Death (or “BSOD”) occurs similar to the above, the computer will not boot. The failure to boot can be caused by a variety of reasons. Many times it’s caused by the BCD/EFI store becoming corrupted (or by being “fixed” incorrectly by Windows particularly if you have a non-standard boot setup).

The following usually gets me up and running. Note that this post only applies to computers having UEFI firmware or using a UEFI emulator like the Clover boot manager or reFIND). Most computers built in the last 10 years use UEFI firmware.

Caution: Backup your hard drives before continuing. Although these commands typically do not cause data loss, it’s possible you have a non-standard configuration and/or defects on your drive. Not responsible for data loss – the following is at your own risk.

    Boot Into Windows Recovery Console

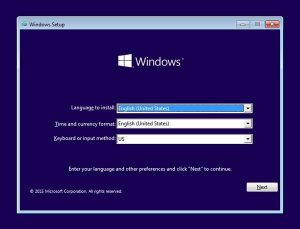
  1. Boot the machine from a USB Flash Drive using the Microsoft Windows Install Media USB drive. You’ll need at least an 8 GB flash drive.
  2. At the install screen below press the “SHIFT-F10” keys together to get a command prompt.Windows Install Dialog
  3. Recovery Console Commands

  4. The Recovery Console will open. Type the following commands:
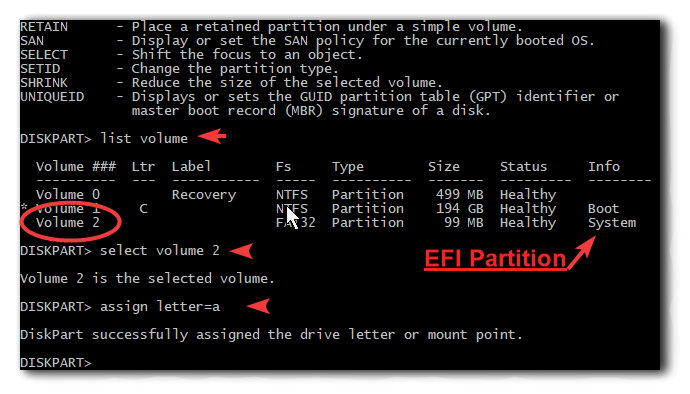
  5. Find the volume that is FAT32, and has no label (or labeled “EFI” and is about 100 MB. It typically is also shown as “SYSTEM” or “Hidden” Here is mine as an example:

    Windows Command Console List Volume

    NOTE: If you do not see an EFI partition your computer is probably older and does not use UEFI firmware, using instead the older Master Boot Record (MBR) method of booting. If this is the case, then this post does not apply to you and won’t help you.
  6. Select that volume (in my example, Volume 2)
  7. Assign it a letter that is not being used by your other drives (I usually use A: as that is almost always available):
  8. Make sure from the list produced by the “list volume” command, that there is a letter assigned to the drive that contains your “Windows” folder. This is usually drive “C”. If the Windows drive is not assigned to C, or if “list volume” does not show a letter assigned to the drive containing your Windows folder, select the Windows volume and assign a letter to it as was done for the EFI volume above. In my example, I do not have to assign a letter since C is already assigned to the Windows drive.
  9. When you are done assigning letters to the volumes, exit diskpart:
  10. Use robocopy to make a backup of the files on your EFI partition in case something goes wrong. In this example I am copying all the files to my G drive, so substitute your backup drive letter for the “g” below. Robocopy automatically will create the “efi-backup” folder:
  11. Before issuing the BCDBoot command, do a chkdsk on each of your EFI and Windows partitons to fix any errors (substituting the letters assigned to your EFI partition and windows partitions respectively for A and C below if yours are different):
  12. Enter BCD Boot Command

  13. When those commands finish, issue the following bcdboot command which copies your system boot files into your EFI partition (substituting the letters assigned to your EFI partition and Windows partitions respectively for A and C below if your letter assignments are different):

    Reboot Computer

  14. Assuming the BCDBoot command was successful, reboot your computer and if you are lucky and the underlying problem that caused the BSOD has been fixed, rebooting will be successful. Note that on rebooting, Windows 10 often takes a while to reconfigure things or autorepairs after a BSOD and BCDboot command. You may get a few more BSODS and have to reboot 2 or three times before you get to the windows login screen.

Multiboot USB with Gandalf’s Win10 PE & Install as Windows Boot Menu

Windows PE distributions are mini-Windows operating systems that one can run from a USB flash memory stick. They are extremely handy particularly when fixing a broken Windows system. I just fixed a PC suffering from a Blue Screen of death by using one.

At the moment, one of the most handy Windows PE distributions is Gandalf’s Win10 PE Redstone. This “Redstone” distribution packs about 4GB of very useful programs and a fully functional super smooth version of Windows 10 into one ISO that can be installed on and booted from a USB drive.

Having this available on a bootable USB stick if anything goes wrong on your windows system is SUPER handy and has saved me countless times.

This tutorial will show you how to build a multi-boot USB stick that will add Gandalf’s Win10 PE distro but is also capable of adding additional operating systems on the same stick. In addition it will show you how to install Gandalf’s Win10 PE on your boot menu. So if your Windows system goes south you have a very useful toolkit available as an option on the boot screen without even needing your USB stick. This tutorial was done using Windows 10 but the steps should be similar for Windows 7 and 8.

Part I Installing Gandalf PE on a Multiboot Yumi USB

  1. Make sure you have at least an 8 GB USB Flash thumb drive that you are ok with reformatting and destroying all data on.

  2. Download Yumi Multiboot
  3. Download the latest Gandalf distribution (I believe there are several, the larger the size the more programs ) Gandalf’s Windows PE
  4. Startup Yumi. Under Yumi’s Step 1, select the USB drive you are dedicating to Yumi. Under Step 2, select “Single Windows PE” option (located near the bottom under Windows PE Builds). Under step 3 select the Gandalf ISO you downloaded. Yumi should look similar to this:

  5. Click Create and let Yumi go to town. It will take quite a while as it will extract the various programs from the ISO and install them on your USB drive. When it is done it should give you a success message. Close the program and verify that it will boot. If it doesn’t see the troubleshooting in the FAQ and How-To’s on the Yumi page.
  6. To add additional distributions to the USB flash drive (anything from countless Linux distros, bootable Dos systems, to other PE systems, etc. – basically anything Yumi lists in its Step 2) just run Yumi again, select the distro in Step 2 in the Yumi program, and download and install the distro. Very easy.
    NOTE: If you want to add Gandalf’s PE to your Windows boot menu, I recommend adding additional distros only after you complete Part II below.

Part II Installing Gandalf PE to the Windows Boot Menu

WARNING: DO THIS AT YOUR OWN RISK!! In particular, but not without disregarding other things that can go wrong, messing with your BCD files can lead to Blue Screens of death like “Inaccessible Boot Drive” errors. I highly recommend backing up your BCD File and if there are any problems, restore your old BCD. You should be able to do this even if you can’t get into your system again by using the bootable USB drive you created in Part I above.
  1. Create a folder named “Gandalf Rescue PE” on the root of one of your drives (it can be C but preferably another hard drive you have on your system).
  2. Open your USB flash drive and select all the files and folders and click copy:

  3. Now navigate to the folder you created in Part II, Step 1 above, and paste all of the Yumi files and folders into that folder.
  4. Download and install EasyBCD (I used version 2.3). The official site is at Neosmart here (the free/register version works fine), but I downloaded it from Softpedia as the download at the official site was problematic. There’s a free version of EasyBCD for personal use, if commercial use is made, paid versions are available. If you don’t want to use EasyBCD you can use BCDedit (see the example entry below in the last step but I won’t other describe editing with BCDedit as it is too lenghty to go into).
  5. Open EasyBCD (ignore any messages on EFI if you do). Before you do anything backup your existing configuration, by clicking “BCD Backup/Repair” and hitting “Backup settings” after you are satisfied with the path:

  6. Now you’re ready to install Gandalf’s Win10 PE. Click “Add New Entry”. Under “Portable/External Media”, click “WinPE” and under “Type” click “Wim Image (Ramdisk)”. Change the name to “Gandalf’s Win10 PE” and under path, click the browse button and look for the “boot.wim” file found in the “Sources” folder inside the folder your created in Part II, #1 above. Check the box for “EMS Enabled”. Your screen should look something like this:

  7. Click “Add Entry”. Close EasyBCD.
  8. On your PC, open “Startup and Recovery” (type this in your search box) and make sure under “System Startup” the Gandalf distribution is being shown and that there is a delay for “Time to display list of operating systems”:

  9. That’s it. Now reboot and you should see Gandalf’s Win 10 PE show up on your boot screen as an option.
  10. As a final note, if someone desires to manually edit the BCD file using BCDEdit (rather than using EasyBCD),the manual entry looks like this (I don’t have room to explain the below but if you are using bcdedit you should know how to create this entry):

    NOTE ON ABOVE FOR MANUAL BCDEDIT ENTRIES: Substitute your drive letter for “K:” above. Also note the GUID used in the device and osdevice lines are the same as the Identifier GUID.