Back Up Your Raspberry Pi Virtually

Here’s a little trick I use to back up my Raspberry Pi without having to shutdown my Home Assistant Raspberry Pi, ejecting drives, or otherwise messing around with physical drives. Once you do the initial preparation, the backups are painless and are essentially done by one command. You can even use a chron job to schedule them. All while your Pi sits in your closet. As a bonus, you will end up with a virtual hard drive (VHD) that you can use to easily image your SD card and/or hard drive again and even attach to your Windows machine to browse if you have the proper drives.
In short the process is as follows: On my Windows machine, in Virtualbox, I create a machine with Debian Linux installed . Then, using Windows’ Disk Manager, I create a dynamically sized Virtual Hard Drive (VHD) of the size I need to backup my Pi’s hard drive, attach that to the Virtualbox machine, and rsync the Pi to the VHD over SSH.
Below are detailed instructions – the first few steps are in my prior post “Backing Up an SD Card to VHD” but I will repeat them here for simplicity.
Preparing Virtual Backup Drive
This step is somewhat lengthy but will only need to be done once. Here we are creating the Virtual Hard Drive which will be the backup drive, attaching it to the Virtualbox machine, and formatting it:
- On your Windows machine, open up Disk Management (right click on the Windows Icon in lower left corner and select Disk Management, or alternatively press Windows Key, type “diskman” and hit enter).
Select “Action” in the menu, then “Create VHD”. If the Action menu items are grey, click on something in the Disk Management window and then try again.
- When the “Create and Attach Virtual Hard Disk” window opens, click “Browse” to name your Virtual Hard Drive file and select the folder where it will be located. In addition, select the options shown below (VHD hard disk format, Dynamic/Expanding). Take note of the file path (in my case g:\trash\Test Virtual Drive.vhd). The “Dynamically Expanding” option will save space on your physical hard drive . Fill in the “Virtual Hard Disk Size” with the size of the drive you are duplicating.
Click “Ok” to create the drive.

Disk Manager will then create and attach the VHD to the list of drives shown. For instance in my case, the VHD attaches as Disk 9. The virtual drive will show as as uninitialized with a red X since we have not formatted it.

- Right Click on the disk number on the left (in my case, Disk 9) and select “Detach VHD”. Close Disk Management. If you fail to detach and close Disk Management you will get an error message later on when you startup up your Virtualbox virtual machine.

- Now open Virtual Box and open your virtual machine settings (I’m not going to explain how to create a virtual machine in Virtualbox as there are plenty of tutorials on the internet).
- Attach your VHD.

- Click “Add” and navigate to your VHD drive and select the VHD drive you create above:

- Your storage settings should now list your VHD in your drive listings. If you are using IDE controllers for your drives, your bootable system disk is Primary Drive One and the VHD will be Secondary Device 1 :

Backing UP
- Now start your Virtual Machine in Virtualbox.

- Login to your virtual machine (I use a separate Putty ssh login so I don’t have to deal with the Virtualbox interface)
- Get your drive device name by using fdisk:
12345sudo fdisk -l
You should see something like this:
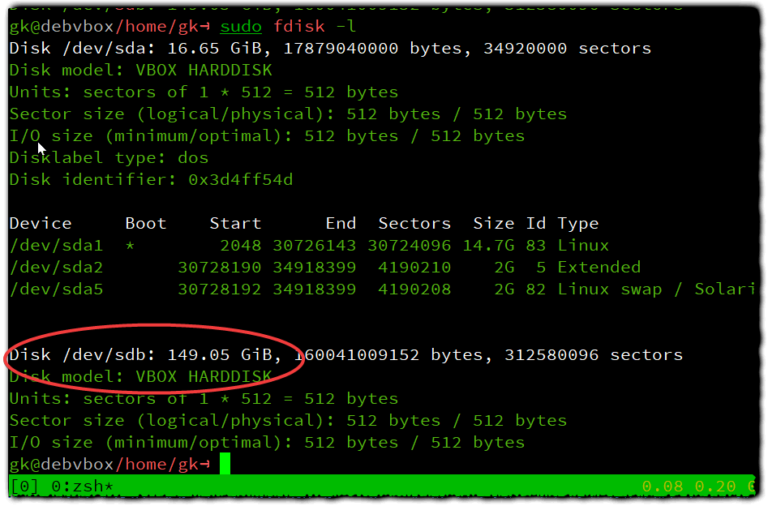
Note the device number of the disk of the VHD you have created. Mine is the 149 GB drive and is shown in the listing above as /dev/sdb.
- Format your drive (the commands below use /dev/sdb but yours might be different – double check with fdisk -l to make sure the device is your backup drive and not your system or other drive):
1234567sudo mkfs -t ext4 /dev/sdb1 [<--- Make sure this is correct as all data will be wiped!!!]sudo mkdir /mnt/backup-pisudo mount /dev/sb1 /mnt/backup-pi
Confirm the mount:
12345mount | grep backup-piIf it mounted correctly, output should look something like this:
12345/dev/sdb1 on /mnt/backup-pi type ext4 (rw,relatimeThat’s it for the preparation of the backup drive. You won’t have to do the above steps again.


Backing Up Your Pi
- You will need to be able to login to your Pi as root using ssh. Make sure you have root login rights (if not, you will need to edit your /etc/ssh/sshd_config file on your Pi. In addition, make sure you are using private/public key authentication. Setting up ssh root access and key authentication is beyond the scope of this article. Note that after the backup you may want to revoke root ssh access by editing /etc/sshd_config and restarting ssh on your Pi.
- SSH into your Virtualbox (not your Pi).
Enter the following to drop to root:
12345sudo -i [to drop to root] - Copy and paste the below rsync command into your command shell, replace [IP to Raspberry Pi] with the ip address of your Pi, and press ‘Enter’ to execute.
12345rsync -avz --delete --exclude '/cache/' --exclude '/dev/' --exclude "**/tmp/" --exclude "/proc/*" --exclude '/swapfile' --exclude '/etc/udev/rules.d/' --exclude '/lost+found/' --exclude '/sys/' --exclude '/mnt' --exclude '/media/' --exclude '/var/cache' root@[Ip to Raspberry Pi]:/ /mnt/backup-pi/
This will do a one way sync from your Pi duplicating the drive more or less exactly onto your VHD, pulling the files to your backup drive on your virtual machine. Note that anything on your backup drive which does not existing on your Pi will be wiped out (i.e., this is a one way mirror sync). This command also excludes various directories that are not needed in a backup and will slow the backup down.
- Let it run to completion. When it is done you will have a full backup of your Pi on your Virtual Hard Drive. The VHD can either be left attached to the Virtual Drive for periodic backups (you can even schedule them using Chron) or detached to be reattached later when you manually back up the Pi. For example, I have a script that runs my Virtualbox Debian machine headless when I startup windows. I could schedule a chron job to periodically rsync my Pi.
Note that for a full backup, your Pi will need to permit SSH root login. If you only wish to backup files of a particular user, then you can adjust the path and modify the rsync command to login in as a non-root user.