Introduction
In the first part of this two part post, I described how I used an old Music & Sound intercom system to power a Skybell HD without having to install a special adapter or a new transformer. This second part will describe how to have the Skybell ring a “virtual doorbell” by causing the Skybell button push to play a doorbell sound over speakers. This is an alternative to hard wiring the Skybell to an analog or electronic doorbell as intended by Skybell or using a service like IFTTT which results in a rather long delay between button push and response.
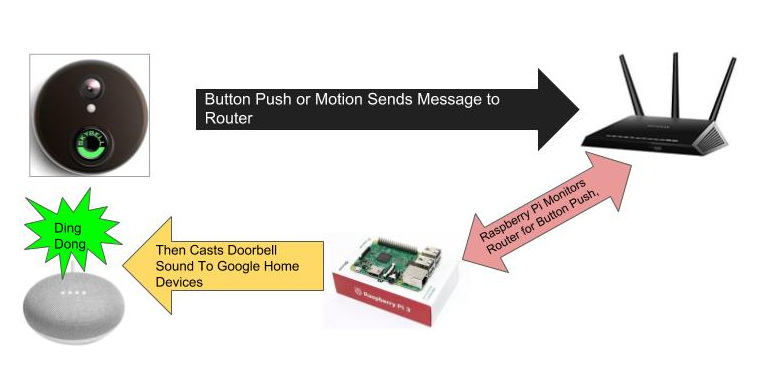
As background, when the button is pressed on the Skybell or when motion is detected, Skybell sends a message over Wifi through your router to the Skybell computers outside of your home network. While the messages can’t be read as they are encrypted, routers that allow ssh logins can run a tcpdump command to monitor network traffic and detect the button press. Once the button press is detected, a script can be triggered to play a sound file or perform any other action. This method results in a much quicker response time than monitoring Skybell’s cloud servers or using IFTTT.
Pre-Requisites
You will need the following to setup a virtual doorbell with Skybell:
- A linux server running on your home network ( I use a Raspberry Pi)
- A router which permits ssh logins (I have a router running dd-wrt firmware which permits ssh)
Installation
-
Install Skybell Sniffer
-
Install Google Home Notifier
-
Specify Doorbell Action
Install the Simple Skybell Sniffer following these instructions. This is a slight modification I made to a portion of a Skybell plugin to Homebridge which was developed by Thoukydides. My modification doesn’t require Homebridge and simply is intended to run as a service on a linux systemd based server (e.g., debian). The Skybell Sniffer is a systemd service which runs a tcpdump on your router through an ssh command. The service monitors the tcpdump output and then runs the command you specify when it detects a message indicating that the Skybell button has been pressed. Since the message is detected before it leaves your network, the response time is much quicker (1 to 2 seconds) then having to rely on IFTTT or having to monitor Skybell’s cloud service. as of 5-23-21, I have updated Simple Skybell Sniffer to Release 0.30 which now works with Mikrotik routers as well as routers such as those flashed DD-WRT firmware which accept ssh logins.
Once Skybell Sniffer is setup and running, we need to set up the action part of the process. The simplest action would be to play an MP3 file of a doorbell ringing and play that over a speaker connected to your Raspberry Pi through the 3.5 mm jack or through blue tooth. However, I have a number of Google Assistant minis and a few Chromecast audio devices throughout my house and I wanted to cast the doorbell sound over those devices. After some research I discovered harperreed’s Google Home Notifier Webservice. This service allows one to cast an mp3 file on any Google Assistant or Chromecast Audio device on your network. It also allows you to have Google Asssistant say any text you want, e.g., “You have a visitor at the door”, however I have found this service to be unreliable at times so I haven’t included it in this write-up but it is explained in the Google Home Notifier readme.
I downloaded Google Home Notifier Webservice, renamed “main.py” to “gnotify.py”, edited gnotify.py to specify the name of the Google Assistant device I wanted the doorbell to play on (e.g., “Living Room Mini”), downloaded a doorbell.mp3 sound file that I found on the web and placed it in the “static” subfolder, and then followed the “getting started” instructions to install:
|
1 2 |
pip install -r requirements.txt nohup python gnotify.py |
To have the Google Notifier start up each time the Raspberry Pi boots, I added the following to my crontab:
|
1 |
@reboot nohup /home/root/scripts/gnotify.sh & |
I then edited the Skybell Sniffer “skybell-actions.sh” script (path is contained in the last line of /etc/default/skybell-sniff) to add the action I wanted to perform on the press of the door bell – playing the doorbell mp3 file I downloaded:
|
1 |
/usr/bin/curl http://127.0.0.1:5000/play/doorbell1.mp3 |
That was it. The system works fairly well and I have been using it for several months.
There are several advantages and disadvantages to this setup over a hard wired connection to a real doorbell as set forth in the Skybell documentation:
Advantages:
- No separate analog or electronic doorbell required
- Infinite actions, sounds, and notifications be triggered
Disadvantages:
- Requires a full time Raspberry Pi to be running ( I don’t find this to be a problem as the pi is low in electricity usage and I already use one for HomeAssistant, I do recommend the Raspberry Pi 3 on up as the prior versions are less stable. I have found the 3 to be rock solid.)
- Relatively complicated – several things can go wrong – wifi could fail, the Pi could fail, the PI could be unplugged, the software programs could stop, someone could turn off or down the speaker and/or Google Assistant/Chromecast Audio device
Despite the disadvantages, I have found this system to work relatively well over the course of several months. The biggest issue has been some instability in the google notifier but I believe I have ironed those out in the scripts. If the doorbell does appear to fail,then simply restart your google notifier by executing the following commands:
|
1 2 |
pkill -f gnotify.py nohup /home/root/gnotify.py &" |


