How Can You Tell Whether Firmware Can be Flashed ?

Atomi Dual Port Wireless Wall Outlet Plug

Flashing ESP Chips with Open Source Firmware

The ESP family of wifi chips is manufactured by Espressif. The chips are ubiquitous in Chinese manufactured IOT devices. The firmware on many of these devices can be replaced by open source alternatives like Tasmota or Esp Home.

How do you know if a device advertised as being Wifi-enabled is able to be flashed ?

You can try to find reviews but the average reviewer doesn’t flash firmware. In addition, many devices are popping up all the time so that it may be some time before some hacker opens up the device to find out.

Example Teardown To Identify Whether Firmware is Flashable

I was in Aldi’s a few days after Christmas and saw a package of two outlet plugs branded “atomi” and marketed as WiFi-enabled Christmas light timers:

Atomi Christmas Light Plug Package

The package was marked down to $12. One was an indoor plug with two 2.4 integrated USB ports as shown above, the second was a heavy duty black outdoor plug:

Atomi Heavy Duty Holiday Outside Wall Plug


A quick search revealed that Amazon was selling the inside plug alone as the “Atomi Smart Wifi Plug” for $20.


 Atomi Smart Wifi Plug

But is it an ESP Chip and Can It Be Flashed with Tasmota?

The biggest question was were they able to be flashed with Tasmota ? Based on the little known name I guessed these were probably ESP8266 type chips but none of the reviews mention being able to flash the device firmware. A google search did not reveal anybody flashing either of these plugs.


NOTE: TLDR:  Below I describe how I researched whether these plugs were flashable.  But if you don’t want to read the whole writeup, the answer is these are in fact easily flashable by TUYA Convert without using any wires or usb/serial tool – you just need a Linux machine; a raspberry pi will do.  On a PI, follow these instructions first, then the generic instructions.  ]

Doing the Research To See If the Device Can Be Flashed

Looking at the back of the package reveals that the plugs are ETL certified for the United States (equivalent to UL approved, good!) with an Intertek Number of 5001673.


ETL Certification of ATOMI Wifi Holiday Plugs


There was no FCC ID but the bar code stated it was “13820-Smart Plug Holiday Pack”.


Atomi Plug Bar Codes


Model Number and FCC ID Brings Some Leads

Going to the Intertek website for ETL Listed Products and typing in “5001673” revealed nothing. But plugging in the model number “13820” produced a couple of listings with the first being by “SHENZHEN FENERGY TECHNOLOGY CO., LTD” conforming to  a UL standard.

Screen Shot of Intertek Website Showing Atomi


After some googling to find the FCC ID number, I tried “fcc model AT1217 SHENZHEN FENERGY TECHNOLOGY CO., LTD. – Shenzhen, Guangdong CHINA” and came up with the listing.

Reading the FCC Documentation to Identify the Firmware

Photos and other information confirmed it was the same plug:

FCC Photo of Atomi Plug


There’s also a “Letter of Declaration Model Difference” stating that AT1217 and At1249 models are the same (google reveals that AT1249 is sold at Home Depot also as an Atomi Smart Wifi Plug )


Clicking on the “internal photos” link in the FCC document shows the inside of the plug and reveals this interesting photo:

And another photo of the other side of the chip showing the four contacts required to flash:
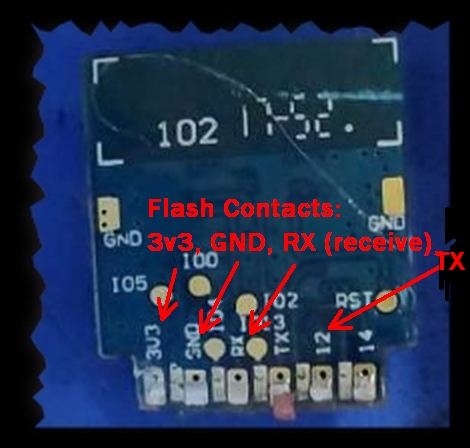
 

Atomi Photo Showing TYWE2s Chip


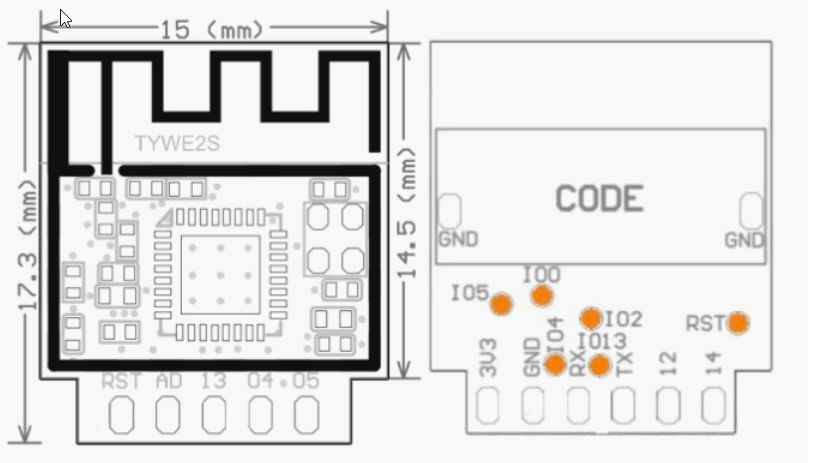
Here’s a drawing found online:

Drawing of TYWE2s Chip

Bingo – It’s Flashable !

So I bought the outlets, brought them home and opened up the interior one (removed the four screws on the bottom and wedged open the case).  I found the TYW2ES chip but the contacts were oriented down and not exposed: 


Inside of Atomi Plug

Exploring Methods to Flash

A quick google of “TYWE2s” shows a tutorial on the Tasmota website flashing an outlet having the same wifi module using the hard wired method.  I tried to grind through the bottom of the white outlet with a rotary tool to expose the contacts ( a dangerous and unnecessary [as explained below) step – do NOT do this!):


 Bottom of Atomi Plug With Drilled Hole


and to flash it with an FTDI usb/serial tool.  But since I didn’t want to take the time of properly soldering the contacts and/or using a jumper, it was an exercise in frustration.

Ah – Wireless Flashing !!

I finally remembered that there were some successful OTA (over the air) methods of flashing these chips, did a google search and found TUYA Convert. I quickly confirmed that the TYWE2S chip is a TUYA and proceeded to flash using the TUYA Convert instructions. Since you need to do this in Linux, I first tried running TUYA Convert in Windows’ WSL but kept getting an error questioning whether my Wifi adapter could be used as an access point. I then ssh’d in to a headless Raspberry Pi I had in the other room and ran the scripts on that machine.  I got the same error.


 I then found this note on prerequisite steps for  a pi, followed those steps, then the main installation steps, and it worked like a charm!

Here is the linux session running TUYA Convert:

Both outlets were easily flashed within 30 minutes without attaching any wires or having to open the devices!


Configuring Tasmota

The Configure Module in Tasmota should be set as follows to allow the manual switch on the plugs to work:


Tasmota Module


Answer Skybell Automatically on Android Using Tasker

Skybell App Opening

Skybell and other video doorbells ring your phone and allow you to see who’s at the door. But they require you to click on the notification and by the time you do that a minute or two may have gone by. In addition you may want to hang a tablet from a wall to act as an electronic peephole, allowing you to see at a glance who’s at the door and to communicate with them.

If you have a Skybell you can do this with Tasker.

Install Skybell, Takser, and Notification Listener Apps

  1. Make sure you have installed your Skybell app.
  2. Android Skybell HD App Install Page

  3. Go to the Google Play store and purchase and install Tasker. Tasker allows you to automate tasks on Android devices. Tasker’s currently $3 and well worth the price.
  4. Google Play Tasker Page

  5. Also from the Google Play store install “Notification Listener” a free plugin for Tasker.
  6. Google Play Notification Listener App Page

    Configure Tasker App To Ring A Bell

  7. In Tasker, click on Profiles tab, then the + sign, and add an Event, Tap “Plugin”, then “Notification Listener”, then “Notification Listener” again:
  8. Notification Listener App Screenshot

  9. Click “Configuration”, and change the event to “Notification to Any”, Click on the App button to select the Skybell App, and change the “Text” option to “You have a visitor at your door.”, settings should look like this:
  10. Tasker Configuration Page - Any Notification Event

  11. Save by clicking on the Checkmark and exiting out.
  12. Back at the Profiles screen, click on “New Task” on the dialog that pops up, name it as “Open Skybell On Ring”, Tap “+”, select “Plugin”, “Notification Listener”, and then “Gestures”:

    Takser Action Plugin

  13. Fill out the Gestures screen by adding “%nlkey” to “Notification Key” and toggle on the “Click on notification”:

    Takser Notification Key Screenshot

  14. Click the checkmark and make sure Tasker and the new profile is enabled. You are done. Your profile tab should have an entry that looks something like this:

    Notification Listener Event

    Now whenever your Skybell rings, tasker will automatically “Tap” on the Skybell notification, and the tablet should automatically open to the live streaming view of your door.

    Troubleshooting: If you are getting notifications but the Skybell app is not opening automatically, make sure you have Tasker and the event/task profile you created above is enabled, and you have permitted Tasker and Notification Listener to have access to the Android notification services (you should have allowed this during setup). If Skybell notifications are not occurring at all, try changing the tablet’s WIFI IP to a static one and use Google’s 8.8.8.8 and 8.8.4.4 DNS as described in my previous post, or uninstalling and reinstalling the Skybell app.

Control Almost Any Infrared Device By Voice

TV Photo by Creedi Zhong on Unsplash

Want to control almost any TV, DVD or other infrared device by voice ? If your device is not a newer model that offers voice assistance, you can add voice control by use of a univeral remote like the Broadlink Mini3 IR Control Hub.

These devices operate like your normal wand remotes with two key differences:

  1. Rather than having a directed beam of infrared which you must point at your device, they flood the room with infrared light so they reach all of the devices in the room that are within a reasonable distance and angle from the universal remote.
  2. They are Wifi enabled and respond to commands you issue over your network.

The simplest way of using the universal remote is to simply follow the manufacturer’s instructions and use the mobile software offered by the manufacturer. However, this will involve using the manufacturer’s cloud account which can expose your home network to vulnerabilities.

The more secure but more complicated approach which I have done is to ditch the manufacturer’s mobile app and cloud account and use Home Assistant installed on a Raspberry Pi (model 3 or higher). The steps are too long to list here, but in short, they involve using an IF This Then That (IFTTT) Google Assistant or Alexa applet to issue a command through Home Assistant to trigger a URL call to your Broadlink universal remote using the Home Assistant broadlink plugin. You will also need to setup a DuckDNS account and a secure SSL connection to your Raspberry Pi. The Home Assistant will allow you to setup the broadlink plugin to issue either one command (e.g., to turn the TV on), or several in a series (e.g., turn the TV on and switch to a particular channel).

Below are two YouTube videos explaining most of the steps other than the IFTTT setup (Note that you only need to listen to the first 11 minutes for the first video for the infrared setup, the remainder is not relevant):

To set up voice commands using IFTTT, use the Google Home Assistant applet to cause a voice command “E.g., Turn on TV” to fetch the DuckDNS URL containing your Home Assistant broadlink command.

Lastly do you have a Roku or Roku enabled TV like the TCL Roku series but it’s not voice enabled ? You can ditch the Univeral Remote entirely as well as the Home Assistant setup and just have the IFTTT Google Assistant applet recipe issue the Roku API url command directly to the Roku device’s API. Much simpler and more reliable!

NOTE: The above advice on the Roku is outdated at least for Google’s Home Assistant. With some limitations, Google Home will now automatically detect Roku and setup voice controls, allowing you to turn on and off, switch apps, etc. See How do I use the Google Assistant with my Roku streaming device? on the Roku support pages.