Skybell and other video doorbells ring your phone and allow you to see who’s at the door. But they require you to click on the notification and by the time you do that a minute or two may have gone by. In addition you may want to hang a tablet from a wall to act as an electronic peephole, allowing you to see at a glance who’s at the door and to communicate with them.
If you have a Skybell you can do this with Tasker.
Install Skybell, Takser, and Notification Listener Apps
Make sure you have installed your Skybell app.
Go to the Google Play store and purchase and install Tasker. Tasker allows you to automate tasks on Android devices. Tasker’s currently $3 and well worth the price.
Also from the Google Play store install “Notification Listener” a free plugin for Tasker.
Configure Tasker App To Ring A Bell
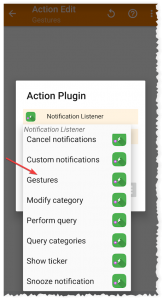
In Tasker, click on Profiles tab, then the + sign, and add an Event, Tap “Plugin”, then “Notification Listener”, then “Notification Listener” again:
Click “Configuration”, and change the event to “Notification to Any”, Click on the App button to select the Skybell App, and change the “Text” option to “You have a visitor at your door.”, settings should look like this:
Save by clicking on the Checkmark and exiting out.
Back at the Profiles screen, click on “New Task” on the dialog that pops up, name it as “Open Skybell On Ring”, Tap “+”, select “Plugin”, “Notification Listener”, and then “Gestures”:
Fill out the Gestures screen by adding “%nlkey” to “Notification Key” and toggle on the “Click on notification”:
Click the checkmark and make sure Tasker and the new profile is enabled. You are done. Your profile tab should have an entry that looks something like this:
Now whenever your Skybell rings, tasker will automatically “Tap” on the Skybell notification, and the tablet should automatically open to the live streaming view of your door.
Troubleshooting: If you are getting notifications but the Skybell app is not opening automatically, make sure you have Tasker and the event/task profile you created above is enabled, and you have permitted Tasker and Notification Listener to have access to the Android notification services (you should have allowed this during setup). If Skybell notifications are not occurring at all, try changing the tablet’s WIFI IP to a static one and use Google’s 8.8.8.8 and 8.8.4.4 DNS as described in my previous post, or uninstalling and reinstalling the Skybell app.
Want to control almost any TV, DVD or other infrared device by voice ? If your device is not a newer model that offers voice assistance, you can add voice control by use of a univeral remote like the Broadlink Mini3 IR Control Hub.
These devices operate like your normal wand remotes with two key differences:
Rather than having a directed beam of infrared which you must point at your device, they flood the room with infrared light so they reach all of the devices in the room that are within a reasonable distance and angle from the universal remote.
They are Wifi enabled and respond to commands you issue over your network.
The simplest way of using the universal remote is to simply follow the manufacturer’s instructions and use the mobile software offered by the manufacturer. However, this will involve using the manufacturer’s cloud account which can expose your home network to vulnerabilities.
The more secure but more complicated approach which I have done is to ditch the manufacturer’s mobile app and cloud account and use Home Assistant installed on a Raspberry Pi (model 3 or higher). The steps are too long to list here, but in short, they involve using an IF This Then That (IFTTT) Google Assistant or Alexa applet to issue a command through Home Assistant to trigger a URL call to your Broadlink universal remote using the Home Assistant broadlink plugin. You will also need to setup a DuckDNS account and a secure SSL connection to your Raspberry Pi. The Home Assistant will allow you to setup the broadlink plugin to issue either one command (e.g., to turn the TV on), or several in a series (e.g., turn the TV on and switch to a particular channel).
Below are two YouTube videos explaining most of the steps other than the IFTTT setup (Note that you only need to listen to the first 11 minutes for the first video for the infrared setup, the remainder is not relevant):
To set up voice commands using IFTTT, use the Google Home Assistant applet to cause a voice command “E.g., Turn on TV” to fetch the DuckDNS URL containing your Home Assistant broadlink command.
Lastly do you have a Roku or Roku enabled TV like the TCL Roku series but it’s not voice enabled ? You can ditch the Univeral Remote entirely as well as the Home Assistant setup and just have the IFTTT Google Assistant applet recipe issue the Roku API url command directly to the Roku device’s API. Much simpler and more reliable!
NOTE: The above advice on the Roku is outdated at least for Google’s Home Assistant. With some limitations, Google Home will now automatically detect Roku and setup voice controls, allowing you to turn on and off, switch apps, etc. See How do I use the Google Assistant with my Roku streaming device? on the Roku support pages.
What is Retro Pie ? It’s software that allows you to play tons of emulators of old game consoles, from home systems like the Atari 2600, Super NES, Super Nintendo, etc. to the old 70’s and 80’s arcade machines that you would find in the mall. It even has the ability to play emulators for old home computers like Commodore 64 and the Sinclair Z80.
More technically, the Retro Pie is a collection of emulators and scripts which use Emulation Station as a front end.
Retro Pie Can Be Installed on Any Debian Based Linux Machine
Here’s a secret: while the Retro Pie is mainly geared to be installed on a Raspberry Pi, you don’t need a Raspberry Pi to install Retro Pie. You can install it on any PC that has a Debian based Linux operating system. Since I had installed Kubuntu on the Zotac Nano, I downloaded and installed the Debian/Ubuntu PC version of Retro Pie.
After installing Retro Pie according to the instructions, adding some themes (I settled on Cabsnazzy) and a set of Xbox 360 controllers, I downloaded some individual sample Roms to test the Mame emulator, an emulator that plays old arcade type games. What I discovered was that there are several different Mame emulators packaged with Retro Pie. For example, there is “mame4all”, “Mame 2000”, “Mame 2003 Libretto”, “Advance Mame”, etc.
The first test I did was to download the Rom Set for Mame 2003. This Rom Set is 0.78. The download links are found at archive.org. The non-merged set is the one that will work with Emulation Station.
For the Mame 2003 set (Romset 0.78, about 2 GB) the easiest way to download is in linux using the linux command line program “transmission-cli” which will download torrent files. Copy the TORRENT link shown on the archive.org page and use that with torrent-cli.
A Complicated Download Process for Mame Roms
For example, to download the 0.78 Rom set on your Linux command line type:
Once downloaded, unzip the downloaded file and move your selected roms to the correct subfolder in your Retro Pie install directory i.e., the “RetroPie/roms/mame-libreto/mame2003/” folder. Do NOT unzip any of the Roms. Copy the contents of the “samples” folder, to “RetroPie/roms/mame-libreto/mame2003/samples”.
Watch out for Mame Vector Roms
Note that any vector type games (e.g., Battle Zone, Lunar Lander, Red Barron) should use Advance Mame 3 which is optimized for vector graphics, not Mame 2003 or other Mame emulators where they will look fairly horrible, with the vector lines being blurry and black and white. Battle Zone will show black and white instead of the green that it should like the following screen shot:
Advance Mame Romsets – a HUGE Download
For Advance Mame, you will need to download the Mame 0.106 Rom Set as shown on the Retro Pie Wiki.
Warning: The 0.106 Romset is HUGE – about 65.6 GB zipped.
Use 7Zip To Download A Huge Zipped Mame Romset Like The 0.106 Romset
Because of its size, the .106 Romset should be downloaded on Windows rather than Linux as the standard Linux zip programs do not handle multi-part zips well and a program that does, 7Zip only works on Windows.
Extract The Files from The Huge Rom using 7Zip File Manager
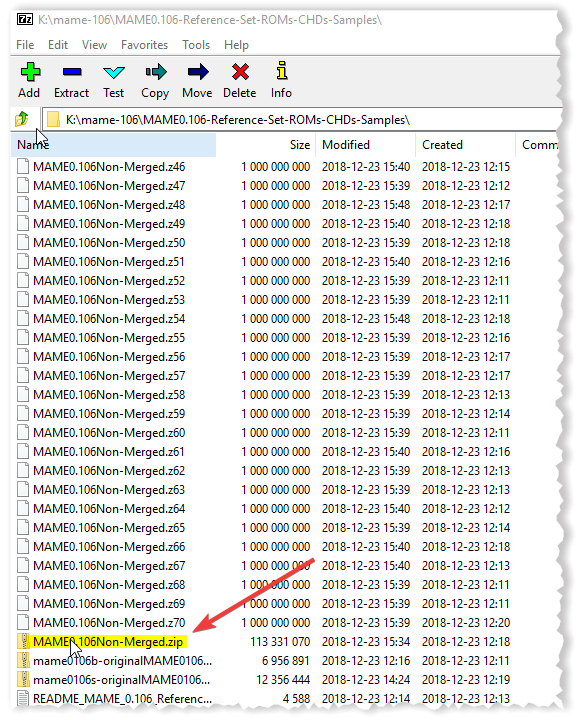
Once the .106 Romset is downloaded, download and install 7zip. Open the 7zip File Manager and navigate to the Romset download folder. For version 0.106 you will see that the zip has downloaded in 70 different parts! No worries, 7zip handles these as one zip file without having to actually combine them.
Double click on the “Mame0.106Non-Merged.zip” file:
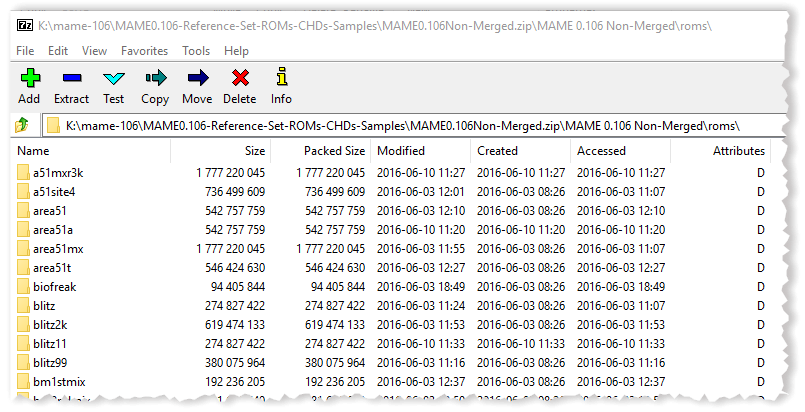
Double clicking will reveal the contents of the “combined” zip file:
Double click on that again and you’ll view the roms folder. Double click on the “roms” folder and you will see a list of the roms, most of them are zipped, but some are simply in subfolders:
While you can extract all of the rom subfolder and zips for all of the games, you can also extract only those individual games that are needed. Just drag the individual subfolders or zip file for a particular game out of the 7Zip File Manage. Do NOT unzip any games roms that are themselves individual zips as they may not work in the emulator if they are unzipped and the Mame emalutor can read the zipped roms fine. For easy transferring to a linux machine, open up a WinSCP session and drop the rom subfolder or zip file into the appropriate folder on your Retro Pie machine (RetroPie/roms/mame-advmame/). As before, the files in “Mame 0.106 Non-Merged\Samples” would be copied over to the related samples folder (RetroPie/roms/mame-advmame/samples).
That’s it – those are the basics of installing the correct romset for a particular Mame version.
NOTE: This post is for educational purposes only. The use of roms with the MAME or other video arcade emulators requires compliance with all copyright laws and licenses. Use of most Roms require an appropriate license. Read this FAQ for details.